
3I1 Understand the block diagram of a superheterodyne and double superheterodyne receivers and the functions of each block.
The meaning of the word the Superheterodyne:
Superheterodyne is a system by which the receiver produces a tunable signal which is combined with the incoming signal to produce a predetermined intermediate frequency, on which most of the amplification is formed.
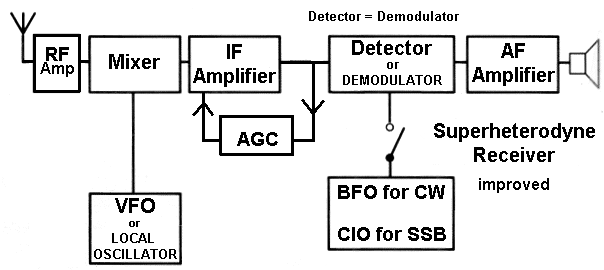
The Double Superheterodyne Receiver, also know as the communication receiver,as you would no doubt imagine is a far more complex piece of electronics than the "simple" Superheterodyne Receiver.
Take some time to look through the diagram below and before reading through the explanation try to work for yourself what parts are doing what.

In the diagram above the RF Amplifier can also incorporate a Pre-selector.
A pre-selector within the RF Amplifier is a band-pass filter that blocks frequencies other than the wanted frequency from passing through from the antenna into the radio receiver's mixer stage. in other words it pre-selects the wanted frequency !!
The original signal in this case is 145.500MHz which mixes with the 1st Local Oscillator to give the Intermediate frequency of 10.7MHz and this frequency passes through all the other stages until the stages which extract the audio as AM, SSB, CW, FM and pass this recovered audio to the Noise limiter and onto the Audio Amplifier.
The AGCcan also extend to the RF amplifier and can be the source of voltage for a "S" meter.
The double superheterodyne allows the choice of high frequency 1st IF, which is desirable to reduce problems with image frequency response, it can also be known as Image Channel (an image frequency is another signal that is like a reflection in a mirror in that it is as far from the local oscillator as the wanted image). The low 2nd IF allows good filtering and plenty of gain to be easily realised.
********See also
the Fig 9.3 page 58 in the RSGB Full Manual for anther picture
to help you get a grasp of the design.
The use of good filters fitted to IF1 and IF2 will be the key to good selectivity.
As two local oscillators are used, there is scope for unwanted frequencies within the receiver. Note the use of the detector/demodulators to accommodate the three modes. The noise limiter seeks to reduce the volume of a loud "spike" of interference without affecting the volume of normal signals.
Local Oscillator (LO)
The LO is the VFO which generates an RF signal for use by the mixer. The circuit of the Local Oscillator has to give a clean and stable signal to the mixer circuit BUT it must be tunable. The local oscillator must be based on a tuned circuit for example a frequency synthesiser type or it can use a direct digital synthesis also known as DDS.
RF Amplifier
Amplifies the wanted weak signal from the antenna while largely ignoring signals outside of the required range by the use of tuned circuits
Intermediate Frequency Amplifier (IF)
The initial RF amplifier will have removed the image channel but there may well still be other frequencies adjacent to the wanted frequency. The IF, which has a high Q factor and fixed frequency must select and then amplify this wanted signal and it provides the main amplification and includes filters, which removes adjacent signals and wrong mixing products.
AGC (Automatic Gain Control)
The AGC provides a constant input level of signal to the system so that the audio remains at about the same output level irrespective of the input signal strength.
Detector (or Demodulator means the same and is interchangeable)
The demodulator recovers the modulating audio signal
Audio Amplifier (AF amp)
Amplifies the signal to drive a loudspeaker.
3I2 Understand the function of a mixer, the generation of the Intermediate Frequencies (IF) and other mixer products
The mixer combines the wanted amplified RF signal with the VFO signal (or as it is sometimes stated, with the local oscillator signal) to produce sum and difference frequencies of the RF signal and the LO signal which in fact are modulated identically to the incoming signal with the resultant frequency being the IF or Intermediate Frequency.
3I3 Understand the advantages and disadvantages of high and low intermediate frequencies and the rationale for the double and triple superhet.
Advantages and Disadvantages of High and Low Intermediate Frequencies (IFs)
In superheterodyne radio receivers, the Intermediate Frequency (IF) is the frequency to which a radio signal is converted after mixing with a local oscillator (LO). The choice of IF can significantly impact the performance of the radio system. There are two common types: high IFs and low IFs.
High Intermediate Frequencies (High IF)
Examples: 455 kHz (used in AM radio), 10.7 MHz (used in FM radio)
Advantages:
Image Frequency Rejection: High IFs can result in better image frequency rejection because they are further away from the RF (radio frequency) band. This reduces the chance of unwanted signals being picked up and mixed with the desired signal.
Better Selectivity: A higher IF allows the use of higher-quality, narrower bandpass filters, which improve selectivity. This means the receiver can better distinguish between closely spaced signals.
Improved Sensitivity: In some systems, high IFs can result in higher sensitivity, especially if the front-end circuitry is designed for high-frequency operation.
Less Intermodulation: High IF systems can sometimes reduce the impact of intermodulation distortion because they can be designed with stronger, more easily filtered front-end circuits.
Disadvantages:
Component Complexity: High IFs require high-frequency components, which may increase complexity and cost. More advanced and higher-frequency oscillators are required.
Limited Dynamic Range: High IFs are typically associated with narrower bandwidths, which could reduce dynamic range in some cases, making it harder to detect weak signals in the presence of strong ones.
Low Intermediate Frequencies (Low IF)
Examples: 70 kHz, 455 kHz (also used in AM radios)
Advantages:
Simplicity in Design: Low IFs often allow simpler designs, requiring fewer stages for filtering and amplification. These are easier to implement in certain low-cost receivers.
Cost-Effectiveness: The use of low IFs generally reduces the overall cost of the receiver because lower-frequency components are cheaper and more readily available.
Low Power Consumption: Lower frequencies allow for lower-power components and less complex circuits, which can lead to energy savings, especially in portable devices.
Disadvantages:
Poor Image Frequency Rejection: Low IFs suffer from poor image rejection because the image frequency is relatively close to the desired signal, making it harder to filter out unwanted signals.
Lower Selectivity: Narrower selectivity at low IFs may make it harder to discriminate between signals that are close together in frequency.
Increased Interference: Low IFs are more susceptible to interference from unwanted signals, including spurious emissions and noise from nearby radio stations.
Rationale for the Double and Triple Superheterodyne Architectures
A superheterodyne receiver works by mixing the incoming RF signal with a local oscillator to produce an IF. However, this can sometimes result in problems, especially in terms of image frequency interference and spurious responses. To mitigate these problems, the double superheterodyne and triple superheterodyne designs are used.
Double Superheterodyne (Double Conversion)
In a double superheterodyne system, the signal is first mixed with
an intermediate oscillator to produce the first IF, and then mixed
again with a second local oscillator to produce a final IF. This
gives better image frequency rejection by using two conversion
stages which helps to further separate the desired signal from the
image frequency. The second mixing stage effectively shifts the
image frequency away from the pass band. It also gives improved
selectivity by separating the image frequencies at both stages,
double conversion allows for better selectivity and filtering at
the final IF. It gives more flexibility in IF selection in choosing
the first and second IFs, which can be optimized to achieve better
performance in terms of sensitivity and selectivity.
However this increased complexity uses many more components
which increases cost and design difficulty.
Triple Superheterodyne (Triple Conversion)
A triple superheterodyne receiver involves three mixing stages,
converting the incoming RF signal through three intermediate
frequencies before reaching the final IF. This gives superior
image rejection. With three IF stages, image frequencies are
pushed further away from the desired signal, which greatly reduces
the likelihood of image interference and more sensitivity. Also
it gives even finer selectivity, which is crucial in high-density
signal environments.
Triple conversion has more costs, more components and greater
complexity in design, and, uses more power and create additional
noise but gives improved overall sensitivity across a wide
frequency range.
Triple Superhet

Look at this diagram and see if you can work out how this works compare to the double superhet. You may see there is an extra oscillator and mixer stage, and that is usually the stage that derives the agc voltage
Conclusion
High IFs are typically used to provide better selectivity and image rejection but come with the trade-off of higher complexity and sometimes reduced dynamic range.
Low IFs are simpler and more cost-effective but suffer from poor image rejection and less selectivity.
Double and triple superheterodyne architectures help address issues like image rejection and selectivity, though they add complexity and increase cost. These multi-stage conversion systems are useful when better performance in crowded or complex RF environments, like the amateur bands, is required.
Understand that for given RF and IF frequencies, there is a choice of two possible local oscillator (LO) frequencies.
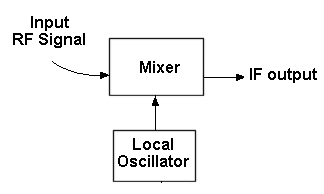
Frequency Conversion:
The process of frequency conversion (mixing) in a superheterodyne receiver involves combining the RF signal with the LO signal. The output of this mixing process will contain components at the sum and difference of the LO and RF frequencies:
fIF = fLO - fRF
This means that the IF frequency is the absolute difference between the LO and RF frequencies, of which there are 2 possible cases.
Given that the IF frequency is defined by the absolute difference between the RF and LO frequencies, there are two possible ways to select the LO frequency:
LO = RF - IF:
In this case, the local oscillator frequency is lower than the RF frequency by the IF frequency. This is known as low-side injection. When the RF signal is mixed with the LO, the difference between the two frequencies gives the desired IF.
LO = RF + IF:
In this case, the local oscillator frequency is higher than the RF frequency by the IF frequency. This is known as high-side injection. Again, the difference between the LO and RF will give the same IF.
Thus, for any given RF and IF frequency, there are two possible LO frequencies:
LO = RF - IF
LO = RF + IF
Choice of LO frequency depends whether to use high-side or low-side injection and depends on factors such as:
The frequency range of the RF signals you're working with.
The design of the receiver system.
The filtering and spurious signal considerations.
Understand the reasons for the choice and calculate the frequencies.
Example:
Suppose you have:
RF frequency: 1000 MHz
IF frequency: 100 MHz
The two possible LO frequencies would be:
LO = RF - IF = 1000 MHz - 100 MHz = 900 MHz (low-side injection)
LO = RF + IF = 1000 MHz + 100 MHz = 1100 MHz (high-side injection)
Both LO frequencies will result in an IF of 100 MHz, but the choice of LO will affect how the circuit processes the signal and the overall system design.
Understand the origin of the image frequency and calculate the frequency from given parameters.
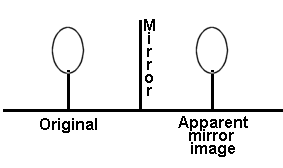
The image frequency is a mirror image of the RF frequency, shifted by twice ( x2 ) the IF frequency, and must be filtered out to prevent interference with the desired signal.
There are two possible LO configurations: high-side and low-side injection.
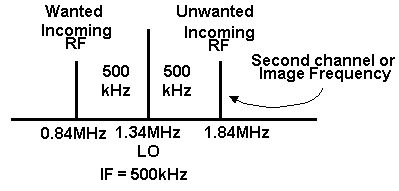
This second channel, or 'image frequency', interference only occurs when there is an unwanted signal on the "second channel" or image channel.
So if you were transmitting in the 1.8MHz band and someone was tuning to the medium wave band and the signal they wanted was twice the IF below your transmission they could hear your transmission as the second channel.
Look at the diagram above and you will see the relationship between the wanted Broadcast Band Signal 0.84MHz on the receiver and the unwanted Amateur Band transmission 1.84MHz as the second image.
So the existence of second channel interference depends on the response of the signal input circuit of the receiver's mixer to a frequency which is separated from the resonant frequency of the input circuit by twice the IF. Changing the IF would reduce the incidence of image interference in this case.
If the wanted and the unwanted signals are an equally distance away from the LO (local oscillator) they will both appear at the audio output.
Example Calculation:
Let's go through an example to calculate the image frequency. Given:
RF frequency fRF = 1000 MHz
LO frequency fLO can be either:
fLO = fRF
- fIF (low-side) or
fLO = fRF +
fIF (high-side).
For Low-Side Injection:
The LO frequency would be:
fLO = fRF -
fIF
fLO = 1000 MHz - 100 MHz = 900 MHz
The image frequency is:
fimage = fRF - 2fIF
fimage = 1000 MHz - 2×100 MHz = 800 MHz
For High-Side Injection:
The LO frequency would be:
fLO = fRF +
fIF
fLO = 1000 MHz + 100 MHz = 1100 MHz
The image frequency is:
f image = fRF + 2fIF
f image = 1000 MHz + 2×100 MHz = 1200 MHz
So let us look at another example:-
If we have a 28MHz band receiver and an intermediate frequency of 8MHz where would the image frequency be ?
The Image Frequency = Frequency + (2 x IF) or put it another way
Frequency + (2 x IF) = Image Frequency
or
The Image Frequency = Frequency - (2 x IF) or put it another way
Frequency - (2 x IF) = Image Frequency
thus 28Mhz + (2 x 8) = 44MHz Image Frequency
thus 28Mhz - (2 x 8) = 12 MHz Image Frequency
In an exam question you could be asked what is the local oscillator frequency when given the wanted frequency and the unwanted frequency (image frequency).
To work that out you need to subtract the lower frequency from the higher and divide the result by 2 as the Local oscillator sits in the middle of the wanted frequency and the unwanted frequency as shown in the diagram above.
But you could be asked to find the IF then you would do the calculation above and then subtract the Local oscillator frequency from either of the wanted or the unwanted frequency.
Understand first the above calculations, then following on, press button below for next page of Receiver Architecture
To more on Receiver Architecture (IF's)
To Transmitters and Receivers menu