

Technical Basics
Antenna concepts
4C2 Understand the front-to-back ratio of an antenna.
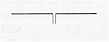
Dipole
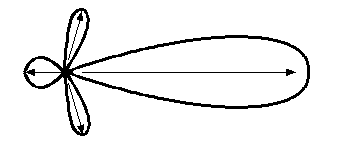
A simple dipole is made up of 2 quarter wavelength radiating elements where the feeder attaches at the centre. It should be cut to resonate on the required frequency band. It has a doughnut (or toroidal) shaped energy field radiating from it when RF is applied. Below is a cross-section of the donut showing the energy field that is radiated. This is called a polar diagram.

In an ideal situation the two lobes shown in the cross-section are equal and have radiation in two directions compared to the horizontal of the ground below. There is little or no radiation off the ends of the dipole.
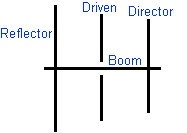
3 Element Yagi
The 3 element yagi has a driven element which is equivalent to a dipole as shown above. Also attached is a reflector to reflect the signal radiated in the backward direction towards the front of the boom. Also there is a director to "direct" the signal forward. This has the effect of amplifying the signal in the forward direction and reducing it in the backward direction. Therefore the Yagi is said to have gain. It is possible to add more directors at the front to further stretch the direction of radiation and increasing the gain even more.

In the diagram above, it shows a balloon shape pattern is now produced when the yagi is energised. The rear lobe of radiation is reduced by the reflector and the front lobe is increased in size and so has increased gain. There is a number of side lobes produced which have little or no gain. On receive the yagi will be more sensitive in the front direction as its directors act like a magnifying glass and make received signals appear larger. The magnifying effect reduces the width of the signal as more directors are added. We can see the lobe off the front is larger than the rear lobe and the difference in sizes is called the front to back ratio. This is measured in dB (decibels). We came across dB in the feeder section. So with a yagi, a positive gain of the aerial can compensate and overcome the negative losses in any feeder. A yagi has directivity too in the forward facing direction.
So what is the concept of a polar diagram. Well it has nothing to do with the north or south pole.
As you are aware antennas radiate, the polar diagram is a representation of the radiation pattern as a simple drawing. The diagram below shows a set of arrows which represents the direction and radiation strength.
The direction is obvious but the radiation strength is proportional to length of the line - the greater the strength longer line.

The diagram is NOT representative of any particular antenna, it is the principle of the direction of the arrow and length of the arrow (showing strength) establishes the polar outline when the arrow head are linked up.
Dipole
Let's start with the polar diagram of the dipole.
It is hoped that you can gather from the animation that wire hanging down in the middle is the feeder and the horizontal wire are the legs of the dipole.
The radiation is then a bit like a doughnut that has been slipped on one end and slid along to the middle.
Thus :-
-
The maximum direction of radiation is then always out away from the wire of the dipole and
-
minimum radiation is along the line of the dipoles there is minimal radiation off the ends of the wire.
Yagi
The yagi diagram develops to show the direction of the maximum radiation in the direction of the arrows. Remember the driven part of the yagi is in fact a dipole and thus the reflector and the directors do a good job of changing the radiation pattern but some of the signal still goes out at the sides and rear of the yagi. The pattern shows the field strength at a particular distance from the antenna and is not intended to show the range of the signal else you would not reach too far if the signal only reached the end to the antenna!!
The longer the arrow the bigger the radiated signal so on the yagi the minimum signal is to the rear next less is to the sides.
Understand the beam width of an antenna.
You can see the dashed lines which represent the beam width of the antenna measured in degrees. The beam width gets narrower and narrower as we add more directors to the yagi.
Understand that radiation patterns exist in three dimensions.
So far we have seen the radiation pattern from a horizontal yagi in the horizontal plane but there is a vertical radiation pattern shaped like an elongated balloon. This comes off at an angle called the vertical angle. This vertical angle is made with respect to the ground. It is also relative to the height that the antenna is above ground. This angle is also known as the "angle of take-off" of a signal or the "sky wave".
4C4 Recall that an isotropic radiator is a theoretical antenna that radiates equally in all directions.
An Isotropic radiator is a theoretical antenna that has a gain of 1.0 and radiates with the same intensity of radiation in all directions. It is the reference standard that all aerials are measured against and their measurement is in dB (decibels).
Recall the Effective Isotropic Radiated Power (EIRP) is based on an isotropic antenna reference rather than a dipole and is expressed in dBi.
An isotropic antenna is said to have 0.0 dB gain. Theoretically, if you could transmit 1 watt of power into an isotropic antenna it would radiate the full 1 watt of power. This is called the effective isotropic radiated power known as EIRP and is measured as 0 dBi (dB-isotropic).
Recall that a half-wave dipole has a gain, in its optimum direction, of 2.15dBi.
Another reference standard used is based on the half wave dipole which radiates stronger than an isotropic radiator because it radiates straight from the elements with no radiation from the ends. A dipole is said to have a gain of 2.15dBi which means 2.5 dB gain compared to an isotropic antenna. dBd is used for a dipole. So another formula dBd = dbi + 2.15. If another antenna is said to a gain of 6dBd and we transmit 5 watts into it, then 6dBd is equivalent to 4 times and 4 times 5 is 20 watts. This is the value of the effective radiated power compared to a dipole.
4C5 Recall that the angle at which the radio wave leaves the antenna is known as the angle of radiation and that longer distances normally requires a lower angle of radiation.
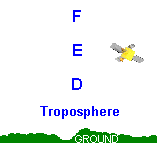
Above the earth are layers of atmosphere that become ionised by the sun's rays. We need to know that this ionisation causes HF signals to reflect back down to the ground, especially the F-layer which is at around 400KMs above the ground.
We need to know that the signal leaving an antenna not only moves in the horizontal direction but also has a vertical pattern of radiation known as the sky wave. At HF the F-layer reflects the signal from the sky wave back to the ground in another part of the world. You can see in our diagram that the high angle of radiation would give a short path around the world where a low angle of radiation between the high sky wave and the ground wave would go off somewhere in between these two and provide a far greater distance after the reflection from the F-layer.
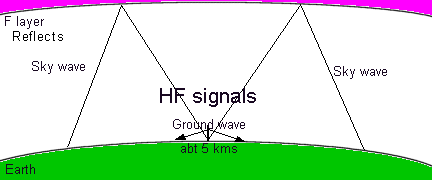
This is why that the height of an antenna matters because a lower angle of propagation then occurs giving even greater distance covered. The angle of radiation is measured against ground. We aim to get this angle as low as possible for working long distance stations.
Recall the effect of the ground on the angle of radiation.
This part is a new concept to you and has not been touched upon in the FL course.
It was James Clerk Maxwell theories of what he called Electromagnetism which explained the relationship between electricity and magnetism. His theory is based upon the idea of an electromagnetic field.
Let's take one step backwards. It is hoped that you have all at one time of another played with iron filings on a piece of paper and moved around a magnet beneath and have been able to move the iron filings around. The movement was caused by a magnetic field affecting the iron filings and the movement of the magnet causing the magnetic field.
It has been explained elsewhere that an electric current when passed through a wire generates and magnetic field. This is what is called a stationary electromagnetic field as it stays bound to item that is causing the field. Examples of stationary fields are: the magnetic field around a wire carrying current or the magnetic field around the magnet.
Now if the current through the wire is changing something special happens if the changes are rapid enough.
The changing electromagnetic field propagates away from its origin in the form of a wave. We know these as radio waves.
The electromagnetic radiation has actually two components parts - an electrical field and a magnetic field. The two fields are located at right angles to each other and the direction of radiation is at right angles to both those fields. This is the concept that you have to know. Why they are at right angles to each other and which one goes where is of no consequence to you at this stage.
Vertical electrical field the vertical polarization
It is the electrical field which determines or defines what is called the polarisation of the radiation wave.
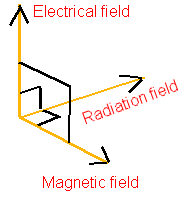
At HF the polarisation of a wire antenna does not matter too much because of the irregular scatter pattern created by twisting in the ionosphere. Polarisation does matter at VHF frequencies. An RF signal is an electromagnetic signal which has an Electric Field (E) at right angles to the direction in which the wave is travelling and a Magnetic Field component (H) which is at right angles to both the Electric Field and the direction of wave travel. The three components are in 3 different planes.
When using VHF and UHF the signals the best signals will normally be received if the same polarisation is used for the transmitter and receiver - else significant attenuation occurs.
The poorest reception of a signal at VHF or UHF would be when the transmitter is say vertical and the receiver is say horizontal
![]() If the
transmitting antenna is set vertically and the receiving
antenna horizontally then the antennas are said to be "cross
polarised" and the poorest received signal is likely.
If the
transmitting antenna is set vertically and the receiving
antenna horizontally then the antennas are said to be "cross
polarised" and the poorest received signal is likely.
4C6 Recall that the current flowing into an antenna is related to the feed point impedance and the potential difference of the applied signal.
RF current flowing to the end of a feeder will have a voltage associated with it associated with its resistance. The power delivered is measured in watts so we can say for example with 10 watts and a feeder and antenna feed point resistance of 50Ω that the feed point current will be approximately 0.45 amps (ohms law). P = I2 x R.
Recall that an antenna will only present the correct feed point impedance when fed with the frequency for which it is designed.
The Impedance at the feed point of an antenna is related to the physical dimensions of the antenna and the frequency of the signal being sent to the antenna. When we carefully design an antenna to match an impedance of 50Ω (say) at the feed point, it is for a very specific frequency. Should you move the height or transmit a different frequency it will show a different impedance, and that is not what we wished for in the original design. Later you will learn how we can still match the antenna impedance at a slightly different frequency to our careful design.
If the antenna impedance and that of the feeder do not match then some energy will be reflected back down the feeder. The amount of that fed back down will be dependent upon what is called the amount of "mismatch".
Recall that a centre fed half-wave dipole has a feed point impedance of 73Ω in free space and that under practical conditions (e.g. due to ground proximity effects) this will be approximately 50Ω when used at its designed frequency.
As stated above height matters. When the dipole is designed to operate in free space with a feed point impedance of (say) 50Ω this is really a theoretical value because when it is raised to a height the capacitive effect in relation to the ground will lower the actual impedance. At optimum height for our 50Ω feeder the impedance at the feed point will also be 50Ω. Other things that effect the impedance are trees and buildings so we try to get the antenna as high as possible for the low angle of radiation and as far away as possible fro other structures but most of all they have an effect on the radiation pattern.